samedi 23 octobre 2010

Center board

Last week-end was a busy one for Lady C....


There was this old boat vendor on the port of Brest, who told me once a motto he said was coming from our old neighbors, accross the channel. He was the kind of old Breton that do not really like the neighbors, but respect them as great sailors. So I was going to start the installation of the legs on my boat back home and I needed to drill 4 holes, about 1/2" in the hull. Humm, the kind of thing, I do not like much. So the old man told me: "as the englishman says, it is better to measure twice and drill once, than the opposite". So, I wanted to try the big centerboard in place before we glued in place the final soles pieces around the trunk. If I had to modify the trunk, better to know it now rather than later.
So the first thing was to lift the boat of its cart. This was done with the tack of Lady C. on one side and the tack of KerNess on the other side and a securing web. All was attached to the garage roof framing.
Then the centerboard was attached to the cart, ready to get in the trunk. The cart was pushed underneath the boat, centerboard inside the trunk.

Last piece was to lower the boat and have the kids put the axis in place through the trunk and centerboard.
It all went very well and we were able to test the lifting mechanism. Hughh it's heavy. I may have to rethink it a bit. At this moment, we have 4 strings, I may be able to add one more.
I also took the opportunity to trim the trunk to the outside shell shape and tapped to layer of cloth from inside the trunk to outside hull.
Next week, we need to glue the sole in place and get ready for the decks...

mardi 24 août 2010

Centerboard or keel or both

Not much to say since last post, other than a lot of dirty sanding time on the hull, before flipping it. But now, I should be OK in the future. I added fiberglass on the hull sides up to the deck, in and out. I also laid two layers of fiberglass on the hull external bottom, for tear and wear.
Then, flip it...
Now time is for centerboard and keel. This is the design change I am trying, since I would like that this boat be either able to have the shallow draft or the preformance with the keel.

A piece of rope, four pulleys and some magic later.... Center board is gone!

Oooohh, how does that work? OK, here is a picture of the trick. You notice that the centre board is not the final one... The final one is ready, but way to heavy for that dummy run.


To install the keel, which a bit thinner than the centerboard (50 mm vs 60 mm), we install a box that fits inside the centerboard well. Note that the bolts for the centerboard go on each side of the keel.
Finally, in position in the large saw cut in the boat's bottom...


Lady C. is making progress!

dimanche 18 avril 2010

Glue

I was away for a few weeks, cruising from Singapore to Mauritius on one new drillship. We had very nice weather all along the route and did not meet anybody with bad intentions in the South China Sea or Malaka strait.

Back home, I took some time to finish putting the planks together and start gluing all this together.


lundi 8 février 2010

Lifting keel and daggerboard

Weather in Houston area is not really enjoyable at this time of the year. It is either warm or cold and it rains. I try to catch all warmer days opportunities to progress with the epoxy. Waiting for the plywood to arrive, I continue on the keel and daggerboard.
The lifting keel has now its final shape before fiber glass layering. It was a bit longer than expected, the wood being really hard. From the initial shape, I mainly use the electric planner to get to the final result, with some final sanding.
The bulb model is made of 1/2" styrofoam plate from Lowes. I cut discs at the size of the drawing and glued them together with cyanocrylate super glue. It is not the best glue for this purpose (tend to eat/melt the foam), but the result is good enough. Each disc that is in the middle of the keel has a cut out for the fin. To cut the styrofoam, I used a soldering gun, it goes very fast. Then all that is shapped to the right dimension. Next step for the bulb is the mold and then I will take this to the foundry for lead pouring. I still need to figure out how to do with the hollow shape of the fin in the bulb, may be use cement or plaster... I will see this later.


I received the steel also for the daggerboard. Instead of welding pieces of flat 1-1/2"x6" and 1"x4" flat bars, I used 1"x10" flat bar with 1/4"x6" flat bar and epoxy glued them on both sides. Like this I avoided any welding. I ordered the flat bar 1"x10", but I had to cut it to shape with my grinder. It took me a while, but it is done...

That the farther I can go, now I need the wood and the fiberglass to continue my boat...

dimanche 10 janvier 2010

First progress

So this week, I ordered the plywood, the epoxy and the fiberglass. I choose to have the plywood precut, I do not have that much time and this will save a lot of it on this project and ensure a perfect shape for all the sheets.
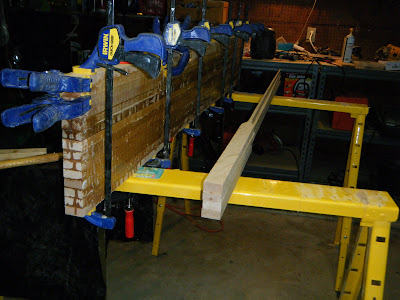
Also I started with the keel fabrication. I used 18 beautiful knot free pieces of 3/4" x 1-1/2" x 72" (19 x 38 x 1,828 mm) red oak from Lowes. They were all cut to shape and glued together one by one. 14 of them are together now. However, following the last talks on global warming in Copenhaguen, the temperature dropped here in South East Texas and I am waiting for the temperature to go up again to finish this initial part. Hopefully, it will be much faster than waiting for the global warming.

Re-engineering

This lifting keel capability has been taking my mind for too long and I was not able to find a lifting solution that I liked very much. In fact I would like a centerbord version for easy launching and shallow water sailing, with the at sea performance of the keel version... The big issue with the keel version, is that I am afraid it becomes so complicated to launch and get started, that it will kill the rest of the sailing fun.

Then I came accross a post on the bateau forum http://forums.bateau2.com/viewtopic.php?f=3&t=17984&hilit=centerboard+sb18, where a member was thinking about keeping the option of both centerboard or keel version on the same boat. This allows to use the centerboard or the keel. It does not lock from start, which design the boat version will be. It requires a simple modification of the centerboard trunk and the addition of a couple removable inserts in the centerboard trunk, when the lifting keel is used. The width of the keel and the centerboard is about the same and I will use the holes made for the axis of the centerboard manoeuvering sheaves to lock the inserts in position. The inserts will become the foward and aft guides of the lifting keel trunk. Here is a quick sketch of the option I am about to take.