Center board up, down wind, under spinnaker, one reef in the main, 8 knots, 3 crew. A stronger wind gust capsize Lady C. After a few seconds, water start entering the cockpit and the mast touches the bottom.
Thanks to all the foam I have put in the hull aft and the forward void spaces, Lady C. stays afloat, but never comes back up. We have to call help and get the Lady C. salvaged by BoatUS.
The mast comes back in 3 pieces, the sails are all damaged and the motor no longer works, but the hull is intact... We have to stay onshore for a few weeks, until we find a new mast and a new set of sails.
Lessons learned:
- Lady C. is well build
- Void space forward and foam in the aft of the hull prevented Lady C from sinking.
Improvement:
- See if I can put foam in the next mast head.
- Buy a wind meter.
- Keep the VHF handy at all times.
- Keep the cell phone, car keys and wallet in handy closed bags.
Thanks to:
- The Oceanis 39 who was the first on the scene and rescue us
- BoatUS who brought Lady C back up
- Pete who had a handy VHF
- Pol who will remember what the big red sail looks like!
vendredi 18 novembre 2011
lundi 25 juillet 2011


Rigging up the mast
So, here is a question that everyone has: How do you rig up a 30ft mast onto a 18ft boat.
It took me a while before having a good answer.
I made a smaller mast with a jib. The mast and the gib are each 2" aluminum pipe, 4 m long. The mast rests on the centerboard trunk, where I have attached a round piece of wood that fits inside the mast pipe end. There are 3 stays to hold the mast in position.
 The jib is attached to the mast, about mid height with a pivot.
 The hook is made of a longer rope around the main mast and that can slide long it up to the spreader bars.

 Once all is in place, one just need to lift and another one old the main mast step, since this one is ligther than the main mast head.

It took me a while before having a good answer.
I made a smaller mast with a jib. The mast and the gib are each 2" aluminum pipe, 4 m long. The mast rests on the centerboard trunk, where I have attached a round piece of wood that fits inside the mast pipe end. There are 3 stays to hold the mast in position.
 The jib is attached to the mast, about mid height with a pivot.
 The hook is made of a longer rope around the main mast and that can slide long it up to the spreader bars. Once all is in place, one just need to lift and another one old the main mast step, since this one is ligther than the main mast head.
vendredi 22 juillet 2011
dimanche 10 juillet 2011
Sea trials #2
Today was sea trial #2. Launched from Seabrook near the Marina under the Kemah bridge.
 Under the Kemah bridge, there is some shadow and plenty place to rig up the mast.
 Here is Lady C., ready to go... It takes about an hour to rig up the mast and get everything ready...
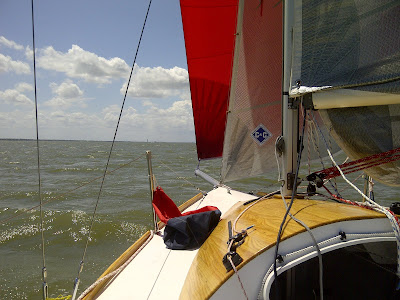
 Went out in Galveston bay, to continue to understand Lady C.. Shortly after reaching the bay, the wind was getting to 15 + knots, so we had to take the first reef. Wind was not very stable and blowing continue to go up, probably 20 knots, as the bay surface was getting choppy and white. To come back, we had to try the spinnaker.

The lessons learned today:
 Under the Kemah bridge, there is some shadow and plenty place to rig up the mast.
 Here is Lady C., ready to go... It takes about an hour to rig up the mast and get everything ready...
 Went out in Galveston bay, to continue to understand Lady C.. Shortly after reaching the bay, the wind was getting to 15 + knots, so we had to take the first reef. Wind was not very stable and blowing continue to go up, probably 20 knots, as the bay surface was getting choppy and white. To come back, we had to try the spinnaker.

The lessons learned today:
- I need to install some nets in the cockpit and in the cabin to store things handy, such as food and water.
- The centerboard trunk is now covered with a plank and somme seals. All is held in place with bungy cord. It is so efficient that when I lifted the centerboard this evening, I could here a pshiittt like air leak. I slightly lifted the trunk cover to ear pffffiiiittt and all air trapped in the trunk under pressure due to the centerboard raised, just vented.
- Though the sea was not calm, I have not seen much water ingress from the spin pole hole in the hull. As it is, I did not instal a seal, might leave it like that...!
- The little 3.5HP outboard drinks more gas than I thought, its gas tank was empty when we needed it on our way back!
- I need to paint the deck with anti-skid paint. Today, we put some soap on the main sail mast rope to help the slidding and after the deck was extremely slippery.
lundi 4 juillet 2011
Looking for a place for the boat
I was looking for a place to store Lady C. this week-end and found frinedly people at the Seabrook Marina. It is just nearby the seabrook bridge and gives access to Clear Lake and Galvestone bay. I got an expensive spot on a slip and a place for the trailer. There is a small crane to launch the boat, so I will need to work the details... I also need to put some antifooling paint on the bottom, if she is going to stay afloat.

The black arrow point at Lady C. future place...

The black arrow point at Lady C. future place...

dimanche 19 juin 2011
On the trailer
So now, I have a trailer. It took me a while to find one though! I bought it from McClain Trailers Inc in Houston, made just for Lady C.


dimanche 22 mai 2011


dimanche 15 mai 2011


dimanche 8 mai 2011


mardi 26 avril 2011

dimanche 6 février 2011
Color
I received blue and white polyurethane bi-component paint. Here is what I foresee. It may change...!
Hull is blue - Deck is white - Cannopy wood varnish - Inside is white... I am not sure which color are the sails, I believe grey. By the way, I need to go and get them this week from the maker.

Hull is blue - Deck is white - Cannopy wood varnish - Inside is white... I am not sure which color are the sails, I believe grey. By the way, I need to go and get them this week from the maker.

Warning up
The weather was a bit better this week end, so epoxy could be mixed again. Two more strips on the canopy and some other work on the center board trunk. Sanding under the hull is no fun...
 I took some time to install the stanchions and life line. It does not look too bad! I went the cheap way for that piece, as stanchions can be very expensive... I used 1" x 20" SS pipe and some handrails bases.
 Under the hull, one can see the ruder and centerboard. On the centerboard top, one can see the hole and slot cut that will be used as anchor point for the the winch webbing. The rudder and centerboard are ready for painting...
vendredi 21 janvier 2011
Winter time
It is cold in Houston, not the right time for epoxy... So progresses are slow.

 I have redesigned the centerboard lifting system a bit. The original design was difficult to operate and I was not confortable with it. I have installed a 600 lbs manual winch borrowed to Kerness trailer with a web strap. There is a key slot in the centerboard top, where the strap is kept in place with a pin. Very efficient and simple design and no more issue with lifting the centerboard.
 I had to use my sander a bit more, to make the center board move freely in the trunk.

The ruder is ready... almost!


In the front, the space below deck is water tight.


All the best for 2011...!
 I have redesigned the centerboard lifting system a bit. The original design was difficult to operate and I was not confortable with it. I have installed a 600 lbs manual winch borrowed to Kerness trailer with a web strap. There is a key slot in the centerboard top, where the strap is kept in place with a pin. Very efficient and simple design and no more issue with lifting the centerboard. I had to use my sander a bit more, to make the center board move freely in the trunk.
The ruder is ready... almost!
On each side of the trunk, there are 2 hatches and a couple fastners to retain the lead in place. I will place the lead in heavy fabric bags and fasten them to the bottom with straps.
In the front, the space below deck is water tight.
The canopy is slowly covered, day after day, with 40 mm x 12 mm strips. Long process, but it is beautifull.
All the best for 2011...!
Inscription à :
Articles (Atom)